Showing posts with label DS18B20. Show all posts

Thursday, November 9, 2017

Getting temperature from ESP8266 over MQTT with Amazon Alexa

With the help of the Iotcentral.eu platform now I can get room temperature or outside temperature with just an ESP8266 and a temperature sensor like DHT22 or DS18B20 or BMP280.

The Alexa is questioning the iotcentral.eu server that will ask my local broker that will publish a message the the ESP8266 to ask the temperature for my room. The values for temperature and humidity will travel the other way around to Alexa, that is so nice and is letting me know about them.

On Iotcentral.eu you will find also a demoapp ( source code on git) for a plug, but you can convert it easy to other IoT device. Also there is a mobile application in Google Play named Homy4( source is on git) that connects to the iotcentral.eu and allows you to turn on/off the plug device from demoapp.

Let me know what you think and what modules do you want to integrate on iotcentral.eu, on Alexa, ESP8266  and on the mobile application.


Everything is done encrypted and authenticated against 2 servers, so the entire communication is secured.

I will publish soon this skill to Amazon so any of you can have it. Just use the demoapp from iotentral.eu and adapt it to send temperature. Maybe will be a good option to create also a demoapp for the temperature, not only for a plug.

The final box is small and compact. I've choose the DS18B20 since it can be integrated well in the box I have. To bad that there are not some enclosures for wemos D1 or nodeMcu which are most popular boards on the market. A printed 3D one it is an option, but takes time and I don't know if they can be produced in a large number.

Final box with eNVi - Alexa thermometer

So now the eNVi-T is up and running in 3 rooms. Next will be an air quality module and maybe an thermostat.

Total cost:10 euro.


Monday, August 29, 2016

DS18B20 temperature sensor and ESP8266

For a small project I had to measure temperature with some waterproof sensor and of course that my first choice was the DS18B20 waterproof sensor and for microcontroller an NodeMCU because I needed also the web server functionality. 


The DS18B20 sensors doesn't have the pull up resistor so I've added one with 4K7 value between DATA and VCC.

The fun is that adding only one sensor I couldn't read its value, but adding two of them in parallel everything was perfect. I've changed the pull resistor in range 1K to 9K4 , I've added a capacitor of 100nF between VCC and GND like it is in this module ( which by the way is working perfect alone with not other sensor in parallel).

Using the same library and sensors with Arduino works perfect, so it looks like my sensors have a problem ( all three of them) or the library need some adjustments for the ESP8266.


Lucky me that the project involved two DS18B20 sensors so for now I will use them like this.

Conclusion: If you have the same problem as I did just add another DS18B20 in paralel.


Picture from http://www.tweaking4all.com/


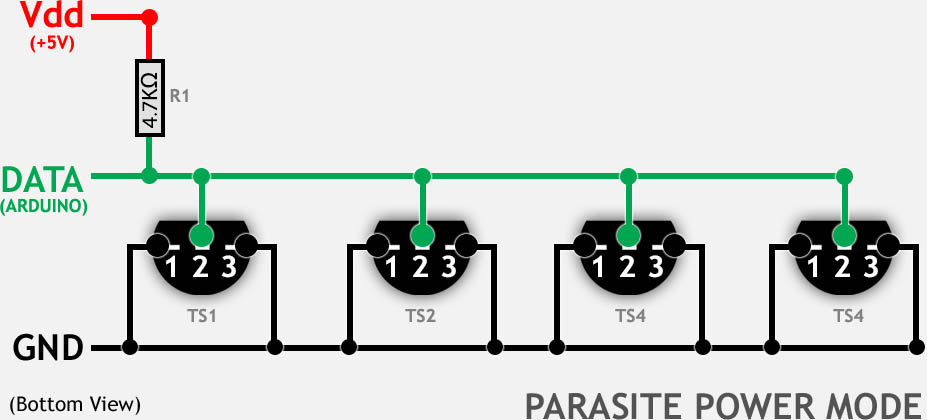
PS: I also tried the parasite mode ( is using only 2 wires instead for 3) but I had the same result.


Picture from http://www.tweaking4all.com/


To do: Connect this module with an 1 meter cable and check if is still working.

[ Later Edit ]. Looks like the probes were defective. After I've changed them everything is working now. I can connect one or more then one without problems.

Sunday, June 26, 2016

More devices IN

I've completed to code to add more devices, so now the module as common code can:


  • update from OTA server if the version on server is bigger the its own version of code
  • get the data from AUTH server (topics, type, MQTT server etc, credentials)
  • get the time from NTP server
  • log data to an external server
  • log debug data to a DEBUG server
  • do  CRON tasks on GPIO pins based on schedule received from Android App
  • send status and its state to Android app.


All these features are part of the common code that will run an all my modules.
Now sky is the limit on what each module can do : 

  • temperature,
  • humidity, 
  • noise, 
  • presence,
  • gas detection, 
  • acceleration, 
  • vibration, 
  • measuring power consumption, 
  • controlling blinds, 
  • garage door, 
  • boiler, 
  • irrigation controller, 
  • fish tank, 
  • motors, 
  • air conditioning or a thermostat etc
  • coffee machines
  • washing machines
  • fridge
  • remote control substitute for TV, Satellite dish, Cable TV or any other IR
  • power sockets
  • exterior lights
  • interior lights
  • power sockets
  • air quality
And the beauty is that I am not limited by the WiFi, the same things I can do with my new LoRa modules.

The all power will be at your finger tips.


 Obs: Later I'll try to add some Artificial Intelligence (AI) to my system, because the IoT without AI  is pretty  much limited on manually or semi automatic control.


Sunday, February 14, 2016

E-ink display Part III

I am finished the ESP8266 connectivity to my E-ink display. 

At the end the module will stay in low power and every 10 minutes will do:

1.Measure the battery level
2.Measure the temperature from DS18B20 
3.Publish the temperature to the thinkspeak account
4.Publish the ip address, SDK version, B/G/N connectivity, it type as JSON over MQTT
5.Publish the temperature as JSON over MQTT on the temperature topic 
6.Read the current time and show it on E-ink display 
7.Go to sleep for another 10 minutes.


*In the next video the last line instead of MQTT broker address it is the Time (I will make another video and I'll replace the current one)


The purpose of this is to have a mobile device that can be moved around the house to publish temperature to my chronothermostat (of course ESP8266 based).

During the heating time device will update itself every minute otherwise every 10 minutes.

The chronothermostat will have an PID controller that will receive temperature from my module.


Github code can be found  here. Cheers.


E-ink display Part I
E-ink display Part II


Wednesday, January 27, 2016

E-ink display Part II

Now you can see the E-ink display in action.

It is connected to the ESP201 development board which also have an DS18B20 temperature sensor attached.

I've managed to reduce the pin numbers so now I can have extra pins to connect more sensors and show their values on this tiny e-ink display.