Showing posts with label ESP8266. Show all posts

Sunday, March 11, 2018

ESP8266 powered by a solar panel and a 18650 battery

On my setup described in here I've added this solar panel from Banggood. If in the past the maximum of battery operated was around 48 days on one charge, now with the help from solar panel I am expecting to run 24/7 without the need to recharge the battery myself.

The panel has dimensions 165x135x2mm and is made from monocrystalline silicon and is rated to 6W and 580 mA.
Exposing it to full sun will produce 6.54 volts and after the diode (I've used a 1N4007) will have 6.00 V.

To connect the solar panel to charger board I've cut a USB to micro-USB cable and I've soldered the part with the micro-USB to the solar panel. The micro-USB cable now can be plugged directly into the charger in its micro-USB connector.

The entire setup is now made from:

Wemos ESP8266  - 1pcs
Wemos Lithium charger board - 1pcs - this is an old version or Wemos Lithium charger board - 1pcs - the new version
BMP180 temperature and pressure sensor - 1pcs.
Battery 18650 -1pcs
Battery holder - 1pcs

The code is the same as in the original post in here.


This is the picture with the module and the LED being GREEN ( battery is fully charged )
Green LED - fully charged

And the entire module with solar panel attached to the window.

The entire module with solar power.


Just after I've added the solar panel the voltage of the battery has start to increase.

Just connected the solar panel to the charger

Now after few days you can see that what is consumed during the night and during the day when there is not enough sun will be recovered in few hour of sun. The panel is mounted to a window where is having sunlight for three four hours in the afternoon.

In the next picture you can see four peaks (one every day), where the charger actually stopped the charging of battery. The charger is cutting the power to the battery at 4.26 - 4.27 V. You can see that by looking to the LED on the charger board that will light green. In the led is red it means that the charger is charging the battery. If there is not enough sun the led will be off which is good because will not drain the battery.
4 days run on solar panel

Now it will run forever and I don't need to load the battery every 48 days.

This is the current voltage on my setup in real time:


After a two days without any sun ( two days of rain) you can see that there are no peeks of fully charged. You can see this in the picture bellow.
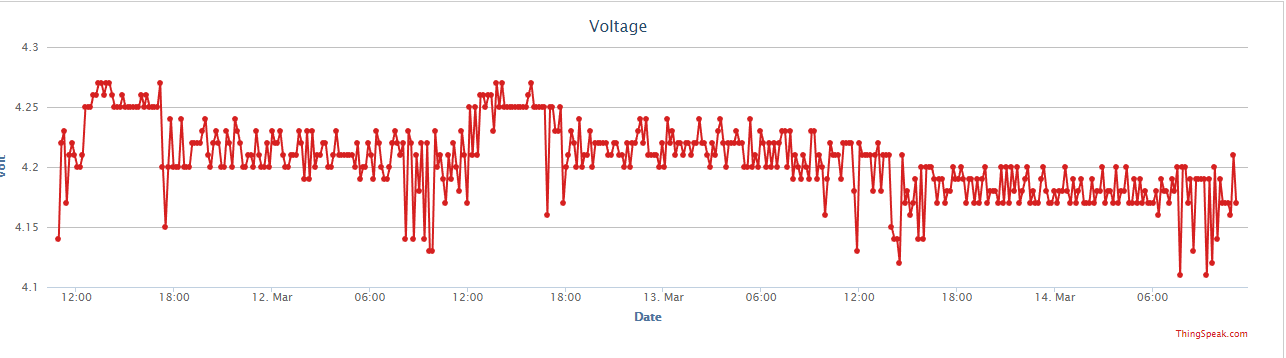
Two days without sun, so there are no peeks

It will be interesting to see if the battery will be fully charged again in the next days with sun.

As you can see in few hours with sun the battery is full again, recovering after a two cloudy days. The LED is green again now.


LED is green again, battery is fully charged
I've let the module to work exclusively on battery for 10 days. I've reconnected the solar panel and in two hours the battery was again fully charged.

Solar panel connected after 10 days on battery


(- I will continue to update this post - )


Saturday, December 2, 2017

BME280 and ESP8266

Latest environmental sensor from Bosh is the BME280 which can measure:

  • temperature
  • humidity
  • pressure

and can be found in mobile phones (Nexus 5). There are rumors  that the BMP280 is a BME280 which couldn't be calibrated for humidity, but I have no confirmation on this.

BME280

Can be used for:


  • Indoor navigation (based on changing the measured altitude - pressure)
  • Outdoor navigation
  • Weather forecast
  • Home application control
  • Context awareness ( change room detection)  
  • Internet of Things.


Temperature precision is ± 1 C degree in 0-60C range.


Can be found in multiple modules, from SPI connectivity to I2C.

Make sure that if you are using the I2C version  to change the I2C address to 0x76. ( Default value for I2C address in Adafruit's library is 0x77).


I2C version

The SPI version can be found around USD 5 here.


Code is similar with the BMP280 , just read the humidity


/******************************************************
 * Catalin Batrinu bcatalin@gmail.com 
 * Read temperature, humidity and pressure from BME280
 * and send it to thingspeaks.com
*******************************************************/

#include <Wire.h>
#include <SPI.h>
#include <Adafruit_Sensor.h>
#include <Adafruit_BMP280.h>
#include <ESP8266WiFi.h>


Adafruit_BME280 bme; // I2C
// replace with your channel’s thingspeak API key,
String apiKey = "YOUR-API-KEY";
const char* ssid = "YOUR-SSID";
const char* password = "YOUR-ROUTER-PASSWORD";
const char* server = "api.thingspeak.com";
WiFiClient client;


/**************************  
 *   S E T U P
 **************************/
void setup() {
  Serial.begin(115200);
  Serial.println(F("BMP280 test"));
  
  if (!bme.begin()) {  
    Serial.println("Could not find a valid BME280 sensor, check wiring!");
    while (1);
  }
  WiFi.begin(ssid, password);
  
  Serial.println();
  Serial.println();
  Serial.print("Connecting to ");
  Serial.println(ssid);
  
  WiFi.begin(ssid, password);
  
  while (WiFi.status() != WL_CONNECTED) 
  {
    delay(500);
    Serial.print(".");
  }
  Serial.println("");
  Serial.println("WiFi connected");  
}

  /**************************  
 *  L O O P
 **************************/
void loop() {

    if (client.connect(server,80))  // "184.106.153.149" or api.thingspeak.com
    {
        String postStr = apiKey;
        postStr +="&field1=";
        postStr += String(bme.readTemperature());
        postStr +="&field2=";
        postStr += String(bme.readHumidity());
        postStr +="&field3=";
        postStr += String(bme.readPressure() / 100.0F);
        postStr += "\r\n\r\n";
        
        client.print("POST /update HTTP/1.1\n");
        client.print("Host: api.thingspeak.com\n");
        client.print("Connection: close\n");
        client.print("X-THINGSPEAKAPIKEY: "+apiKey+"\n");
        client.print("Content-Type: application/x-www-form-urlencoded\n");
        client.print("Content-Length: ");
        client.print(postStr.length());
        client.print("\n\n");
        client.print(postStr);    
    }
    client.stop(); 
    //every 20 sec   
    delay(20000);
}


If your readings are with almost 2 degrees more than the expected value is because the BME280 is to close to the ESP8266. Try to keep at least 10 cm between the BME280 and ESP8266 to eliminate the RF heating and heating produced by ESP8266. 

Also is possible that you run the BME280 in normal mode ( more samples per second) versus forced mode when you are reading the values exactly when you need them ( here the drift is around 0.6 degrees Celsius).

The complete datasheet can be found here.

Sunday, November 12, 2017

Getting air quality with ESP8266 and Amazon Alexa

If last week I've managed to get the temperature and humidity with ESP8266 and Alexa, now it's time to integrate the air quality sensor GP2Y1010AU0F from Sharp.

The GP2Y1010AU0F it is a compact optical dust sensor that has an infrared emitting diode and a phototransistor that are diagonally arranged. It detects in fact the reflected light of the present dust in the air. It is effective to detect very fine particle like cigarette smoke and it can distinguish from the house smoke from the house dust.

GP2Y1010AU0F sensor.
It has 6 pins and the electronic inside is split in two parts, the IRED emitting part and the phototransistor (receiving part)

Internal schematic
For the Air quality module I've used an wemos D1 board. The datasheet for the GP2Y1010AU0F is referring as VCC and the provided output by using a 5V power supply. Since the ESP8266 on analog input is limited to 1V and the wemos D1 is having an 220K and a 100K divider, I've choose to power the transmitter part to 5V and the receiver part with 3V3.

According to the specification in the datasheet also you will need an 150 ohm resistor and a 220uF capacitor, both came with the package.

Connect them according to the datasheet.

Resistor and capacitor

The provided analog output is proportional with the number of the dust particle in the air. Powering the phototransistor part with 3V3 will not get exact the output graph from the datasheet unless you will not use the 5V Vcc. If you need to be 100% to the datasheet and you are using an wemos D1, add a resistor in series with the output VO (pin 5) so the maximum voltage on the A0 input will not exceed 1V. Probably an 180k resistor will be fine.

Output voltage vs dust density


Based on the output voltage you can setup some steps for the air quality like excellent, very good, good, fair or dusty.

Here is a video clip on how is working with iotcentral.eu platform and Amazon Alexa.


Now eNVi-A is online. Total cost: 18.50 euro.

Thursday, November 9, 2017

Getting temperature from ESP8266 over MQTT with Amazon Alexa

With the help of the Iotcentral.eu platform now I can get room temperature or outside temperature with just an ESP8266 and a temperature sensor like DHT22 or DS18B20 or BMP280.

The Alexa is questioning the iotcentral.eu server that will ask my local broker that will publish a message the the ESP8266 to ask the temperature for my room. The values for temperature and humidity will travel the other way around to Alexa, that is so nice and is letting me know about them.

On Iotcentral.eu you will find also a demoapp ( source code on git) for a plug, but you can convert it easy to other IoT device. Also there is a mobile application in Google Play named Homy4( source is on git) that connects to the iotcentral.eu and allows you to turn on/off the plug device from demoapp.

Let me know what you think and what modules do you want to integrate on iotcentral.eu, on Alexa, ESP8266  and on the mobile application.


Everything is done encrypted and authenticated against 2 servers, so the entire communication is secured.

I will publish soon this skill to Amazon so any of you can have it. Just use the demoapp from iotentral.eu and adapt it to send temperature. Maybe will be a good option to create also a demoapp for the temperature, not only for a plug.

The final box is small and compact. I've choose the DS18B20 since it can be integrated well in the box I have. To bad that there are not some enclosures for wemos D1 or nodeMcu which are most popular boards on the market. A printed 3D one it is an option, but takes time and I don't know if they can be produced in a large number.

Final box with eNVi - Alexa thermometer

So now the eNVi-T is up and running in 3 rooms. Next will be an air quality module and maybe an thermostat.

Total cost:10 euro.


Monday, October 2, 2017

MQTT Broker on ESP8266

Running an MQTT broker to serve all devices for a house ( 20pcs) it requires at least a Raspberry Pi or an equivalent SOC.

SD card fails from time to time and requires some Linux skills to make it work and the final price is over USD 70. (Good power supply, case, HDMI cable, keyboard )

But how about running an MQTT broker on this USD 3.99 ESP8266 board ? It is possible ? Yes, it is ! Go to http://iotcentral.eu and with few clicks you will be able to flash your ESP8266 ( 4Mb) with the binary. 

No need to compile code, to solve errors , just click and run. More than that your MQTT broker will communicate with your http://iotcentral.eu instance so you still get your messages on your phone if your mobile app is connecting to the websockets to your http://iotcentral.eu cloud instance. 

But what I am at home and my internet connection is down ? Can I communicate with my devices or I am isolated?  Don't worry, your mobile app will still be able to connect to the ESP8266 MQTT Broker over the websocket so you can control your devices.

Thursday, December 1, 2016

BMP280 and ESP8266

The BMP280 is the next generation sensor from Bosch and follows its predecessors BMP085 - BMP180. Price for it is now under $2 with free shipping.


Key parameters

  •  Pressure range 300 … 1100 hPa (equiv. to +9000…-500 m above/below sea level)
  •  Package 8-pin LGA metal-lid
  • Footprint : 2.0 × 2.5 mm², height: 0.95 mm
  •  Relative accuracy ±0.12 hPa, equiv. to ±1 m
  •  (950 … 1050hPa @25°C)
  •  Absolute accuracy typ. ±1 hPa  (950 ...1050 hPa, 0 ...+40 °C)
  •  Temperature coefficient offset 1.5 Pa/K, equiv. to 12.6 cm/K  (25 ... 40°C @900hPa)
  •  Digital interfaces I²C (up to 3.4 MHz) SPI (3 and 4 wire, up to 10 MHz)
  •  Current consumption 2.7µA @ 1 Hz sampling rate
  •  Temperature range -40 … +85 °C


Typical applications

  • Enhancement of GPS navigation
  •  (e.g. time-to-first-fix improvement, dead-reckoning, slope detection)
  •  Indoor navigation (floor detection, elevator detection)
  •  Outdoor navigation, leisure and sports applications
  •  Weather forecast
  •  Health care applications (e.g. spirometry)
  •  Vertical velocity indication (e.g. rise/sink speed)


For connecting the BMP280 to ESP8266 the following pins need to be connected: 


BMP280
NodeMCU / WeMos D1 mini
Other ESP8266
VCC
3V3

GND
GND

SCL
D1
GPIO 5
SDA
D2
GPIO 4
CSB
3V3

SDO
3V3


The BMP280 supports the I²C and SPI digital interfaces; it acts as a slave for both protocols. 

The I²C interface supports the Standard, Fast and High Speed modes. 

The SPI interface supports both SPI mode ‘00’ (CPOL = CPHA = ‘0’) and mode ‘11’ (CPOL = CPHA = ‘1’) in 4- wire and 3-wire configuration. The following transactions are supported: Single byte write  multiple byte write (using pairs of register addresses and register data) single byte read multiple byte read (using a single register address which is auto-incremented) 


Connect the CSB pin to GND to have SPI and to VCC(3V3) for I2C.

The 7-bit device address is 111011x. The 6 MSB bits are fixed. The last bit is changeable by SDO value and can be changed during operation. 

Connecting SDO to GND results in slave address 1110110 (0x76), connecting it to VCC results in slave address 1110111 (0x77), which is the same as BMP180’s I²C address. 

The SDO pin cannot be left floating, if left floating, the I²C address will be undefined.

In my setup I've connected CSB and SDO to VCC to have I2C and 0x77 as address.


To run a quick test I've installed the Adafruit Sensor library and Adafruit BMP280 library .

The code to test the BMP280 is the example code from library.

This code assume that the SDA and SCL are connected on GPIO 4 and GPIO 5. If you need to assign new pins to your BMP280 use the Wire.begin(2,0) where the GPIO 2 is connected to SDA and GPIO 0 is connected to  SCL.

Now its time to add some code to read the temperature and pressure, post them to the thingspeak.com and also update the temperature gauge on this blog.


/**********************************************
 * Catalin Batrinu bcatalin@gmail.com 
 * Read temperature and pressure from BMP280
 * and send it to thingspeaks.com
**********************************************/

#include <Wire.h>
#include <SPI.h>
#include <Adafruit_Sensor.h>
#include <Adafruit_BMP280.h>
#include <ESP8266WiFi.h>

#define BMP_SCK 13
#define BMP_MISO 12
#define BMP_MOSI 11 
#define BMP_CS 10

Adafruit_BMP280 bme; // I2C
// replace with your channel’s thingspeak API key,
String apiKey = "YOUR-API-KEY";
const char* ssid = "YOUR-SSID";
const char* password = "YOUR-ROUTER-PASSWORD";
const char* server = "api.thingspeak.com";
WiFiClient client;


/**************************  
 *   S E T U P
 **************************/
void setup() {
  Serial.begin(9600);
  Serial.println(F("BMP280 test"));
  
  if (!bme.begin()) {  
    Serial.println("Could not find a valid BMP280 sensor, check wiring!");
    while (1);
  }
  WiFi.begin(ssid, password);
  
  Serial.println();
  Serial.println();
  Serial.print("Connecting to ");
  Serial.println(ssid);
  
  WiFi.begin(ssid, password);
  
  while (WiFi.status() != WL_CONNECTED) 
  {
    delay(500);
    Serial.print(".");
  }
  Serial.println("");
  Serial.println("WiFi connected");  
}

  /**************************  
 *  L O O P
 **************************/
void loop() {
    Serial.print("T=");
    Serial.print(bme.readTemperature());
    Serial.print(" *C");
    
    Serial.print(" P=");
    Serial.print(bme.readPressure());
    Serial.print(" Pa");

    Serial.print(" A= ");
    Serial.print(bme.readAltitude(1013.25)); // this should be adjusted to your local forcase
    Serial.println(" m");

    if (client.connect(server,80))  // "184.106.153.149" or api.thingspeak.com
    {
        String postStr = apiKey;
        postStr +="&field1=";
        postStr += String(bme.readTemperature());
        postStr +="&field2=";
        postStr += String(bme.readPressure());
        postStr += "\r\n\r\n";
        
        client.print("POST /update HTTP/1.1\n");
        client.print("Host: api.thingspeak.com\n");
        client.print("Connection: close\n");
        client.print("X-THINGSPEAKAPIKEY: "+apiKey+"\n");
        client.print("Content-Type: application/x-www-form-urlencoded\n");
        client.print("Content-Length: ");
        client.print(postStr.length());
        client.print("\n\n");
        client.print(postStr);    
    }
    client.stop(); 
    //every 20 sec   
    delay(20000);
}


Temperature logging


A post about BMP180 attached to a battery shield can be found here.